

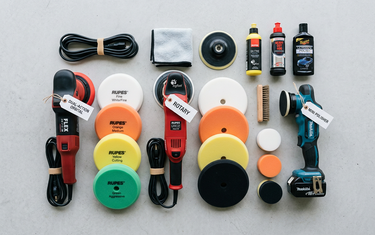
Buying your first polisher is exciting, and a little confusing. Every machine seems to come with its own list of numbers: throw size, backing plate diameter, OPM, cordless or corded, free or forced. It's easy to end up with a tool that's more aggressive than you're ready for, or one that's too small for the work you actually want to do.
The good news is that only a handful of choices really matter for a beginner. Here's how we help first-time buyers pick the right machine at Vital Detail Supplies.
The three types of polishers
1. Dual action (random orbital)
A dual action (DA) polisher spins the pad and moves it in an offset orbit at the same time. On a "free" random orbital, the spin isn't locked to the motor, so the pad slows down if you press too hard or tilt the machine. That built-in safety net makes it very hard to burn through paint or leave buffer trails, which is why we recommend a DA for almost every first-time buyer.
DA machines also handle the full process, from cutting with a compound to finishing with a polish to applying a sealant, so you won't outgrow one quickly.
2. Forced rotation (gear-driven orbital)
A forced rotation polisher also orbits, but the rotation is driven by gears, so the pad keeps turning under pressure. You get more cutting power than a free DA with less risk than a rotary. It's a great second machine, or a first machine for someone who already has some experience. The FLEX FX3331-2C Forced Random Orbital Polisher is a cordless example.
3. Rotary
A rotary spins the pad in a single, fixed circle. It cuts fast and is the tool of choice for heavy defects and wet sanding, but it builds heat quickly and can leave holograms if your technique isn't refined. We love rotaries in experienced hands. For a first machine, save it for later. If you're ready to step up, look at the Rupes LH19E Rotary Polisher or the FLEX FC3311-Z Rotary Brushless Polisher.
Throw size explained
"Throw" (or orbit) is how far the pad moves off-center as it orbits, measured in millimeters. In general:
- 8-9mm: Smaller, tighter orbit. Easy to control, good on curves, and a forgiving place to start.
- 12mm: A common size on mini polishers and versatile all-rounders. Great for smaller panels, bumpers and spot work.
- 15mm: A long-throw sweet spot for many enthusiasts, usually paired with a 5" backing plate. Covers ground quickly while staying manageable.
- 21mm: A big orbit for big flat panels like hoods, roofs and doors, usually on a 6" backing plate. Very efficient, but it takes a little more practice on curves and tight areas.
Bigger isn't automatically better. A larger throw spreads the work over a bigger area, which is fast on flat panels but harder to keep flat on tight curves. Many detailers end up with two machines: a long-throw tool for panels and a mini for everything else.
Backing plates and pad sizes
The backing plate is the hook-and-loop disc the pad attaches to. The pad should be slightly larger than the plate so the edge of the plate never touches the paint. As a general guide:
- 3" backing plate: about 3.5" to 4" pads
- 5" backing plate: about 5.5" to 6" pads
- 6" backing plate: about 6.5" to 7" pads
Always match the pad to the plate your machine actually has, and check the product listing for the exact pad size. Replacement plates like the Rupes Backing Plate Pad Velcro Multi Hole let you swap sizes or replace a worn plate.
Pro tip: Long-throw machines are designed around specific pads. Using the matching brand's pads usually gives you the smoothest, most stable result.
Corded vs. cordless
Corded polishers give you unlimited run time and are usually lighter in the hand for the price. The tradeoff is managing a cord around the car (drape it over your shoulder so it never drags across the paint).
Cordless polishers have come a long way. No cord means no snagging on mirrors or bumpers and no hunting for an outlet, which is a big deal for mobile work. The tradeoff is battery cost and run time, so plan on a second battery if you polish whole cars. Some machines, like the Rupes iBrid line, can run on battery or plug in, giving you the best of both.
Machines we recommend
Great first DA polishers
- Maxshine M8S V2 8mm Dual Action Polisher: an 8mm machine built with beginners in mind.
- FLEX FC3321-Z Random Orbital Polisher (Corded): a brushless corded random orbital from FLEX.
- FLEX FX3321-2C Free Random Orbital Polisher Kit: the cordless 24V version for driveway and mobile work.
- Maxshine M15 Pro Dual Action Polisher: a 15mm throw on a 5" backing plate with a long power cord.
Step-up long-throw machines
- Rupes LHR15 Mark V Random Orbital Polisher: a 15mm orbit on a 125mm backing pad, a favorite all-round machine.
- Rupes BigFoot LHR21 Mark V: a 21mm orbit on a 150mm backing pad for large panels.
- Rupes HLR15 BigFoot iBrid Polisher Basic Kit and Rupes HLR21 BigFoot iBrid Polisher Basic Kit: cordless or corded flexibility in one tool.
- Liquid Elements T4500 Pro Corded Polisher: a 15mm corded orbital polisher.
For tight spots
- Rupes BigFoot Mini LHR75E: a 12mm orbit for bumpers, mirrors and small panels.
- Rupes iBrid Nano II Polisher Full Kit: a compact system for door jambs, pillars and trim areas.
Pads and polishes to start with
You don't need a huge collection. One cutting pad, one polishing pad and one finishing pad, plus a compound and a polish, will cover most cars:
- Cutting: Rupes DA Coarse Cutting Foam Pad with Rupes DA Coarse High Performance Cut Polishing Compound
- Polishing: Rupes DA Fine Polishing Foam Pad with Rupes DA Fine High Performance Fine Polishing Compound
- Finishing: Rupes DA Ultra Fine Finishing Foam Pad
- One-step option: Rupes Uno Protect One Step Polish and Sealant for cars that only need a light enhancement plus protection
- Another pad option: Lake Country CCS Cutback Orange Light Cutting Pad
Keep pads clean as you work by brushing them out or using a Lake Country Pad Washer. A clogged pad cuts less and finishes worse.
Your first session
- Wash and decontaminate. Polishing over grit or bonded contamination just grinds it in.
- Set up good lighting. You can't fix what you can't see. Our guide on why lighting matters for paint correction walks through it.
- Start with a test spot. Try the least aggressive combo first (finishing pad and polish) on a small section, then step up only if needed.
- Prime the pad. Work a little product into the face, then use 3-4 small drops per section.
- Work small sections. About 2 ft x 2 ft, with slow, overlapping passes and light, even pressure. Keep the pad flat.
- Wipe and inspect. Remove residue and check your work under your light before moving on.
- Protect the finish. Follow up with your wax, sealant or coating.
Always work in the shade on cool panels, keep the pad away from sharp edges and trim, and follow the instructions on each product's label.
Quick buying checklist
- Choose a DA (random orbital) for your first machine.
- Pick a throw that fits your cars: 8-15mm for most beginners, 21mm if you mostly polish big flat panels.
- Decide corded or cordless based on where you work.
- Match pad size to the backing plate.
- Start with one cutting, one polishing and one finishing pad, plus a compound and polish.
- Add a good inspection light.
Not sure which polisher is right for you? Stop by our store at 9121 Garvey Ave in Rosemead or call us at (626) 656-6226 and we'll help you put together the right starter kit. Happy detailing!
