
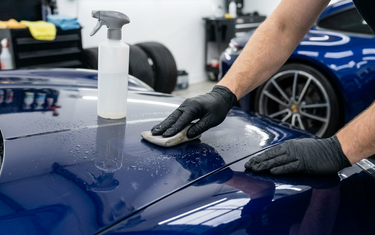
Wax, sealants and ceramic coatings are only as good as the surface they go on. If your paint still has bonded contamination, polishing oils or old wax on it, your new protection won't bond properly. It will look good for a few weeks and then fade, bead poorly or wear off early.
Washing alone doesn't remove everything. Iron particles from brake dust, tar, tree sap, overspray and industrial fallout stick to the paint and stay there after a normal wash. That's where decontamination and clay come in. Here's the full prep process we recommend at Vital Detail Supplies, from first wash to the moment you apply protection.
Do you need to clay? Try the bag test
After washing and drying the car, put your hand inside a thin plastic sandwich bag and lightly glide it across the paint, especially on the hood, roof, rear bumper and lower doors. The bag exaggerates what your fingers feel. If the paint feels rough or gritty instead of glass-smooth, it has bonded contamination and is ready for decon and clay.
As a rule of thumb, most daily drivers benefit from a full decon and clay once or twice a year, and always before applying a ceramic coating or a long-lasting sealant.
Step 1: Wash thoroughly
Start with a proper wash so you're not grinding loose dirt into the paint during the clay step. Clean the wheels first, use a pre-wash or foam, then do a contact wash with two buckets. If you need a refresher, see our two-bucket method guide and how to clean wheels and tires.
Work in the shade on cool panels. Every product in this guide works better, and is safer, when it isn't drying in direct sun.
Step 2: Chemical decontamination (before you touch the paint with clay)
Removing as much as possible chemically means less work for the clay, less pressure and less risk of marring.
Iron removal
Iron removers dissolve embedded brake dust and rail dust, and most change color (usually purple) as they react. Spray a product like CarPro IronX, Labocosmetica SIDERO Iron Remover Gel or ADS Iron Fallout Remover on a cool, clean panel, let it dwell for the time on the label without letting it dry, then rinse thoroughly. For a quicker maintenance option, CarPro IronX Snow Soap lets you wash and remove light iron in one step.
Tar, sap and bugs
Spot-treat tar spots, sap and bug residue with a dedicated remover like Stoner Tarminator, GYEON Q²M Tar or Gtechniq W8 Bug Remover. Let it soften the deposit and wipe gently rather than scrubbing. Rinse or re-wash the area afterward.
Step 3: Choose your clay
Clay works by shearing off whatever is still bonded to the surface after chemical decon. There are two main styles:
- Traditional clay bars give you the most feel and are the best choice for heavily contaminated paint. Start with a fine or mild grade like Koch Chemie Clay Bar Blue (Mild), MJJC Fine Grade Clay Bar, CarPro Clay Bars or Maxshine Clay Bars. Save an aggressive bar like Koch Chemie Clay Bar Red (Abrasive) for stubborn overspray, and plan to polish afterward.
- Synthetic clay mitts, towels and pads are faster on large areas and can be rinsed clean if dropped. Options include the Autofiber Holey Clay Mitt, Autofiber Holey Clay Towel, Nanoskin AutoScrub Clay Sponge (Fine) and the Autofiber Holey Clay Disc for use on a DA polisher.
Not sure which to pick? Start with the gentlest option that gets the paint smooth. Any clay can leave light marring on soft paint, and a more aggressive clay makes that more likely.
Step 4: Clay the paint the right way
- Use plenty of lubricant. Clay should never touch dry paint. Use a dedicated lubricant like Koch Chemie Clay Spray, or a slick, diluted car shampoo solution in a spray bottle. Re-spray whenever the surface starts to feel tacky.
- Work small sections. Go panel by panel in sections about 2 ft by 2 ft. Flatten a bar into a palm-sized patty, or lay the mitt flat on the panel.
- Glide with light pressure in straight lines. Let the clay do the work. At first you'll feel and hear it grab; keep gliding until it moves silently and smoothly.
- Wipe and check. Wipe the section with a clean, plush microfiber towel and do the bag test again. Move on once it feels glass-smooth.
- Keep the clay clean. Check the face of the bar often. When it looks dirty, fold and knead it to expose a fresh side. Rinse mitts and towels frequently.
- Dropped it? Throw it out. A clay bar that hits the ground picks up grit that will scratch your paint. Synthetic mitts and towels can be rinsed off thoroughly instead.
Clay the glass too while you're at it. It removes the same contamination and helps glass sealants and wipers perform better. Store bars in a case like the Clay Bar Storage Box, with a little lubricant, so they don't dry out.
Step 5: Rinse, dry and inspect
Rinse the car to remove clay residue and lubricant, then dry it with a large, plush drying towel. Now look closely at the paint under good light. Our guide on why lighting matters for paint correction explains why this step catches so much.
If you see swirls, scratches or light marring from claying, this is the time to polish. Polishing before protection gives you the best gloss and means you're not locking defects under a coating. A one-step polish is enough for most cars; heavily marred paint may need a compound like Koch Chemie H9.02 Heavy Cut followed by a finishing polish.
Step 6: Panel prep (the step most people skip)
Polishes, glazes, clay lubricants and old waxes leave oils on the paint. Those oils can hide fine defects and, more importantly, stop sealants and ceramic coatings from bonding.
Lightly mist a panel prep spray onto a section, or onto a towel, and wipe it off right away with a clean, short-pile microfiber. Use a second dry towel to buff off any remaining residue. Good options include ADS Panel Prep, Koch Chemie Panel Prep Spray, Gtechniq PW Panel Wipe, Yum Cars Panel Wipe and CLEAN. Panel Prep Spray. Work in a ventilated area and keep panel prep off plastic trim and rubber where the label says to.
How much prep does your protection need?
- Wax: clean, decontaminated paint is enough. Panel prep is optional, since most waxes are forgiving.
- Sealant: panel prep is recommended, especially after polishing, so the sealant bonds directly to the paint.
- Ceramic coating: panel prep is essential. Coatings need bare, oil-free paint to bond and last as long as they're rated. Prep every panel right before you coat it.
Step 7: Apply your protection
Apply your wax, sealant or ceramic coating in the shade, on cool panels, following the product's directions for application, flash time and cure. Keep the car dry and out of the rain for the cure time on the label, and wait before washing with soap. The cleaner your prep, the better your protection will look and the longer it will last.
Your prep checklist
- Wash thoroughly, wheels first, in the shade
- Iron remover, then tar and bug remover where needed
- Clay with plenty of lubricant until the paint is glass-smooth
- Rinse, dry and inspect under good light
- Polish if needed
- Panel prep to remove oils
- Apply wax, sealant or ceramic coating and let it cure
Not sure which clay, prep or protection fits your car? Stop by our store at 9121 Garvey Ave in Rosemead or call us at (626) 656-6226. We're happy to help you put together the right decon and prep kit. Happy detailing!
