

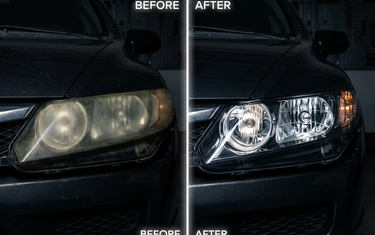
Cloudy, yellow headlights make any car look older than it is, and they're more than a cosmetic problem. A hazy lens scatters and blocks light, so your headlights don't light up the road the way they should at night.
The fix is very doable at home with some patience and the right supplies. The most important part, and the one most people skip, comes at the very end. Here's how we restore cloudy headlights at Vital Detail Supplies.
Why headlights turn cloudy
Most modern headlight lenses are made of polycarbonate plastic, which is tough but breaks down under sunlight. From the factory, the lens has a clear UV-protective hard coat on the outside. Over years of sun, heat, road debris and car washes, that coating wears thin, cracks and oxidizes. Once it fails, the lens surface underneath starts to yellow and haze too.
That's why restoring a headlight is a two-part job. First you remove the failed, oxidized layer. Then you put new UV protection back on, because the sanding and polishing take away whatever was left of the factory coating.
Quick check before you start: wipe the lens with a damp microfiber towel. If it looks clear while wet and goes cloudy again as it dries, the damage is on the outside and you can fix it. If the haze or moisture is on the inside of the lens, surface restoration won't help.
What you'll need
A quick, honest note: we don't currently carry an all-in-one headlight restoration kit. A headlight restoration is really a small paint correction job, though, and we stock the individual pieces to do it well.
- Cleaner: an all-purpose cleaner such as ADS CLEAN All Purpose Cleaner, plus clean towels like the Autofiber [Utility] All-Purpose Edgeless Microfiber Towel.
- Masking tape: Q1 Masking Tape conforms to curves and removes without leaving residue.
- Sanding: the KXK SK-1 Sanding Kit includes soft and hard sanding blocks with 1500, 2000 and 3000 grit 2-inch discs. For machine sanding, CarPro Silicon Sanding Discs and Rupes Foam Abrasive X-Cut discs (made for wet sanding on contours) are good options.
- Polish: a compound or one-step polish to remove sanding marks, such as Koch Chemie F6.01 Fine Cut or Sonax Cut & Finish, and a fine finishing polish like Koch Chemie M3.02 Micro Cut.
- Pads and tool: small pads suit headlights best, like the Koch Chemie Fine Cut Pad or the DIY Detail Gold Standard Waffle Pad. A compact machine like the FLEX PXE 80 12-EC Cordless Mini Polishing Kit, which is designed for spot repairs and headlights, makes the job much easier. If you're shopping for a machine, see our guide to choosing your first polisher.
- UV protection: a coating suited to headlights (more on this in Step 5).
Step 1: Clean the lens
- Wash the front of the car, or at least the headlights and the paint around them.
- Spray the lens with your all-purpose cleaner, agitate gently with a towel and wipe it clean. You want bugs, road film and old wax gone before any sanding starts.
- Dry the lens and the surrounding paint completely so your tape sticks.
Step 2: Mask everything around the headlight
Sandpaper and polish will happily damage the paint, chrome trim and rubber around a headlight. Run two or three layers of masking tape around the whole lens, covering the edges of the hood, fender and bumper. Take your time here. Five minutes of masking saves you a paint repair.
Step 3: Sand off the damaged layer
Every sanding kit is a little different, so follow your kit's instructions for grits, wet or dry sanding, and technique. A few general rules apply no matter what you use:
- Try polishing first on light haze. If the lens is only slightly dull, a polish alone may be enough. Only sand if polish doesn't do it.
- Start with the least aggressive grit that removes the yellowing, then step through finer grits to refine the scratches.
- Cover the whole lens evenly. Use a consistent pattern so every area gets the same amount of sanding.
- Wipe and inspect between grits. Move on only when the lens has a uniform, even haze with no yellow spots or deeper scratches left.
- Keep it wet if your kit calls for wet sanding, and stay off the masking tape and surrounding paint.
Don't panic when the lens looks frosted and worse than when you started. That uniform haze is exactly what you want before polishing.
Step 4: Polish to full clarity
- Prime a small pad with a few drops of compound or a one-step polish.
- Work the lens in small, overlapping passes with light to moderate pressure. Keep the machine moving and the pad flat so the plastic doesn't get too hot.
- Wipe off the residue and check under good light. Repeat until the sanding haze is gone.
- Finish with a fine polish on a soft pad for the best clarity.
- Wipe the lens completely clean so no polish oils are left before protection.
Pro tip: A flashlight or the sun at an angle shows remaining sanding marks far better than overhead light. Our lighting guide explains why.
Step 5: Protect the lens from UV (don't skip this)
This is the step that decides whether your work lasts. Sanding and polishing removed the old, failed UV coating, which means the plastic is now bare. Leave it unprotected and the sun will start yellowing it again, often much faster than the first time.
Choose a product made for or approved on headlights and follow its label for prep, application and cure:
- GYEON Q² Trim EVO is a coating for plastics, and GYEON specifically lists clear-coated trim such as tail and headlight covers after they've been renovated.
- Adam's Graphene Ceramic Coating lists headlights among the surfaces it can be applied to.
- Hi-Lustre Ceramic Spray Coating is an easy spray-and-wipe option recommended for headlights as well as paint, glass and trim.
Keep the headlights dry for as long as the label recommends after application, and remove your masking tape when you're done.
Keeping headlights clear
- Wash the headlights with the rest of the car using a gentle shampoo.
- Reapply or top up your protection on the schedule the product recommends.
- Park in the shade or a garage when you can. Less sun means slower aging.
Headlight restoration checklist
- Confirm the haze is on the outside of the lens.
- Clean the lens and surrounding area and dry it fully.
- Mask the paint, trim and rubber around the headlight with two or three layers of tape.
- Sand following your kit's instructions, from coarser to finer grits, until the haze is uniform.
- Compound and polish until the lens is crystal clear.
- Wipe the lens clean and apply a UV-protective coating suited to headlights.
- Let it cure as directed, then maintain it with regular washes and top-ups.
Not sure which sanding discs, polish or coating to grab for your headlights? Stop by our store at 9121 Garvey Ave in Rosemead or call us at (626) 656-6226 and we'll help you put together everything you need. Happy detailing!