
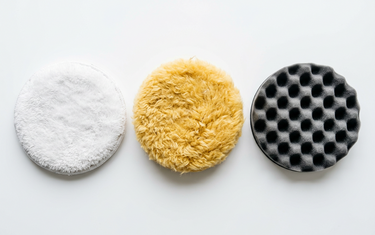
Look at a wall of polishing pads and it's easy to feel lost. There's foam, microfiber and wool, in a dozen colors and several sizes, each promising more cut or a better finish. Pick the wrong one and you either barely touch the swirls or leave behind haze you then have to chase.
The pad is half of your polishing combination, and once you understand what each material does, choosing gets simple. Here's how we explain polishing pads to customers at Vital Detail Supplies.
Cut vs. finish: the basic tradeoff
Every pad sits somewhere between two goals. Cut is how quickly a pad and product remove defects like swirls, scratches and oxidation. Finish is how clear and glossy the paint looks when you're done. More aggressive pads remove defects faster but can leave a little haze or micro-marring behind, which a softer pad and finer polish then refine.
The pad is never the whole story. Your result comes from the pad, the compound or polish, the machine and your technique working together. As a rough guide, though, here's how the three materials compare.
Foam pads
Foam is the most common pad material and the most versatile. Foam pads come in a range of densities: firmer foams for cutting, medium foams for polishing, and soft foams for finishing and applying glazes or sealants. They're forgiving, easy to control on a dual action polisher, and a great place for beginners to start. Some have special features like textured or waffle faces, tapered edges or center holes to help them run cooler.
- Rupes DA Coarse Cutting Foam Pad, Rupes DA Fine Polishing Foam Pad and Rupes DA Ultra Fine Finishing Foam Pad: a complete cut, polish and finish set from one system.
- Lake Country CCS Cutback Orange Light Cutting Pad: a popular light-cut foam pad.
- Lake Country HDO Black Finishing Foam Pad: a tapered finishing pad with a center cooling chamber, from Lake Country's Heavy Duty Orbital line.
- Lake Country Waffle Pro Orange Light Cutting Pad: a waffle-face option for light cutting.
- Oberk Medium Foam Polishing Pad: made for single-step polishing and light swirl removal.
Microfiber pads
Microfiber pads have a short layer of microfiber fibers on top of a foam interface. Those fibers bite into the paint more than foam does, so microfiber pads deliver a lot of cut on a dual action polisher, and they're especially popular on harder clear coats. The tradeoff is that they can leave more haze, so many detailers follow up with a foam polishing step. Microfiber pads also load up with residue quickly, so clean them often.
- Rupes DA Coarse Microfiber Extreme Cut Pad: built for fast removal of severe defects on cured or harder paint.
- Griot's Garage BOSS Microfiber Pads: designed for deep scratches and heavy swirls with an orbital polisher.
- Buff and Shine URO-Fiber Cutting Pad: a fiber cutting pad from Buff and Shine.
- Rupes DA Fine Microfiber Polishing Pad: a microfiber pad on the polishing side of the scale.
Wool pads
Wool is the traditional heavy hitter. Wool pads cut fast, run relatively cool and are great for heavy oxidation, deep swirls and sanding marks. They're closely associated with rotary polishers, though there are now wool and wool-blend pads made for dual action machines. Wool usually leaves the paint hazier than foam, so plan on a follow-up polishing step.
- Rupes DA Coarse Wool Polishing Pad: a wool pad made for dual action tools and severe defects.
- Lake Country Purple Foamed Knitted Wool Pads: a wool and foam hybrid, with versions for rotary and orbital machines. Check the listing for the pile that suits your polisher.
- Koch Chemie Lambswool Pad: a short-pile natural lambskin pad for heavy imperfections.
- Rupes Twisted Wool Rotary Pads: for rotary users.
A word about pad colors
There's no universal pad color code. One brand's orange pad might be a light cutting pad while another brand uses orange for something completely different. The color only tells you where a pad sits in that brand's lineup. Always check each brand's own chart or the product listing to see whether a pad is meant for cutting, polishing or finishing.
Pairing pads with compound and polish
Think of the pad and the liquid as a team:
- Heavy defects: a cutting pad (wool, microfiber or firm foam) with a compound.
- Moderate defects or a one-step: a polishing or light-cutting foam pad with a polish or one-step product.
- Final refinement: a soft finishing foam pad with a finishing polish.
Many brands design pads and liquids as a system, and pairing them is the easiest place to start. For example, the Rupes DA Coarse pad pairs with Rupes DA Coarse High Performance Cut Polishing Compound, and the DA Fine pad pairs with Rupes DA Fine High Performance Fine Polishing Compound.
Pro tip: Always start with a test spot using the least aggressive combination, and change one thing at a time. Wipe the area clean and inspect it under good light before stepping up. Our guide on why lighting matters for paint correction explains how to set that up.
Pad size vs. backing plate
Pads are sized to match the backing plate on your machine, and the pad should be slightly larger than the plate so the plate's edge never touches the paint. A 5" plate typically takes a pad around 5.5" to 6", for example. Always check the listing for the exact pad size and match it to your plate. Smaller pads on a smaller plate are great for bumpers, pillars and tight areas. If you need a new plate, the Rupes Backing Plate Pad Velcro Multi Hole comes in several sizes. Our guide on how to choose your first polisher covers plates and throw size in more detail.
Keeping pads clean
A pad clogged with spent product and paint residue cuts less, runs hotter and finishes worse. Clean on the fly and again at the end of the day.
- Between sections: brush the pad face while it's on the machine. The Maxshine Foam Pad Cleaning Brush & Pad Removal Tool and Rupes BigFoot Claw Pad Tool both pair a brush with a tool for pulling pads off the plate. For wool, the Lake Country Buffing Pad Cleaning Spur removes caked-on polish as you work.
- After the job: wash your pads. Snappy Clean Boost Pad Cleaning Powder releases wax and polish from foam, wool and microfiber pads with a short soak, and the Lake Country Pad Washer makes cleaning a stack of pads quick.
- Dry completely before storing, and keep pads in a clean, closed container so they don't pick up dust.
Some product makers recommend keeping a pad dedicated to one polish, so it's worth labeling your pads by product.
When to replace a pad
- The hook-and-loop backing is peeling or won't grip the plate.
- Foam is torn, crumbling, hardened or collapsed in the center.
- Microfiber is matted or bald and won't brush back up.
- Wool is heavily matted or keeps shedding fibers.
- The pad won't come clean or starts marring paint it used to finish well.
Having several pads for each step lets you swap to a fresh one when a pad gets saturated or hot, instead of pushing it past its best.
Quick pad checklist
- Pick the material for the job: wool or microfiber for heavy cut, foam for polishing and finishing.
- Check each brand's chart; colors aren't universal.
- Pair the pad with the right compound or polish.
- Match pad size to your backing plate.
- Do a test spot and inspect under good light.
- Clean pads often and replace them when they wear out.
Not sure which pads fit your polisher and paint? Stop by our store at 9121 Garvey Ave in Rosemead or call us at (626) 656-6226 and we'll help you build the right pad lineup. Happy detailing!